Introduction
This article will guide you through the process of adding images to your Local Wiz project. You can add images using two methods: Direct Upload and Media Library.
Method 1: Direct Upload
1. Access Your Project
- Log in to your Local Wiz account.
- Navigate to the project you want to edit.
2. Select the Image Upload Option
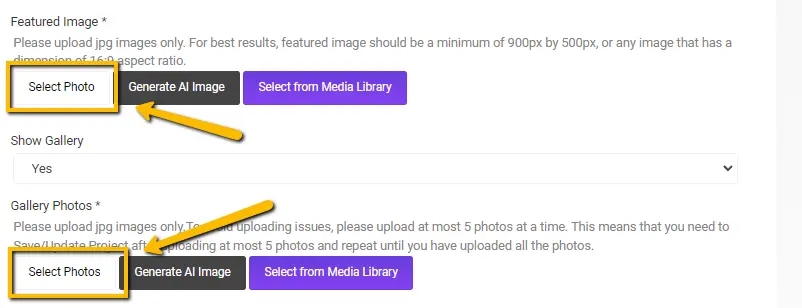
- Locate the image upload section in your project editor.
- This section is typically a button or icon labeled “Add Image” or “Upload Image.”
3. Choose an Image
- Click the “Select Image” button.
- This will open a file explorer window.
- Navigate to the location of the image you want to upload.
- Select the image and click “Open.”
4. Upload and Position the Image
- The image will begin uploading.
- Once uploaded, you can drag and drop the image to position it within your project.
- You can also resize and rotate the image as needed.

Method 2: Media Library
1. Access the Media Library
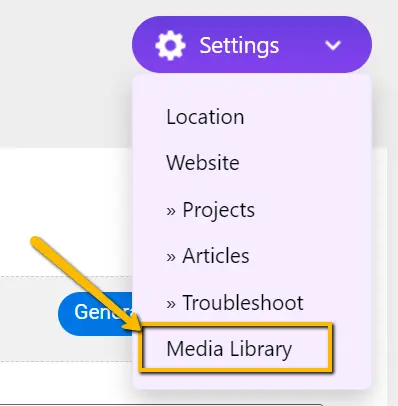
- Go to your Local Wiz dashboard.
- Click on the “Settings” icon.
- Select “Media Library.”
2. Upload Images to the Media Library
- Click the “Upload Photos” button.
- Select the images you want to upload from your computer.
- The images will be uploaded to your media library.

3. Insert Images into Your Project
- In your project editor, locate the image upload section.
- Instead of selecting “Select Image,” choose “Media Library.”
- This will open your media library.
- Select the desired image and click “Insert.”
Additional Tips
- Image Quality: Ensure your images are of high quality for optimal display.
- Image Size: Consider the appropriate image size for your project to avoid long loading times.
- Image Format: Use JPEG format only.
- Image Optimization: Compress images to reduce file size without compromising quality.
By following these steps, you can effectively add images to your Local Wiz projects, enhancing their visual appeal and overall presentation.
Please let us know if you have any other questions or require further assistance.